
A shopify return portal is a self-service page where customers find their order, pick the items they want to return, and submit a request without emailing your team. It replaces an unstructured inbox conversation with a clear starting point for returns and exchanges.
This guide covers the benefits, manual handling versus a portal, seven setup steps with Yanet, and what to test before launch. For an overview of the app, read the Yanet Returns & Exchanges app breakdown.
What Is a Shopify Return Portal?
A shopify return portal collects structured information: the customer’s order, selected item, return reason, and preferred resolution. It gives customers a storefront entry point and sends requests to a merchant dashboard for review and processing. You may also see it called a shopify returns portal or returns page.
The distinction between a refund and a request page matters. A refund in the admin does not create a customer-facing request page. Your team needs a way to receive the request, check eligibility, and decide what happens before processing the resolution.
For merchant-side refund and cancellation tasks, consult Shopify’s guide to refunding and cancelling orders. The customer-facing page serves a different purpose: collecting the information your team needs to handle the request.
Benefits of a Self-Service Returns Portal
A shopify return portal is most useful when routine information gathering takes longer than reviewing the actual return. Its benefits include:
- Fewer clarification emails: Collect the order, item, reason, and requested solution together.
- Consistent eligibility checks: Apply defined rules instead of relying on staff to remember every exception.
- Anytime submission: Customers can start a request without waiting for your support hours.
- Clearer product feedback: Structured reasons make recurring sizing or description problems easier to identify.
- Alternatives to refunds: Offer eligible exchanges or store credit rather than treating every request as a refund.
- A familiar appearance: Branding helps customers recognize the page as part of your store.
- Better communication: Status emails keep customers informed as requests progress.
A shopify returns portal still needs staff ownership. Someone should review requests, handle exceptions, and check that customers receive the promised resolution.
Shopify Return Portal vs Handling Returns Manually
Compare a shopify return portal with your current process by looking at each task, not just the number of emails you receive.
| Task | Manual: Email and Spreadsheet | Portal |
|---|---|---|
| Starting a return | Customer writes to support. | Customer opens the request page. |
| Collecting information | Staff asks for missing details. | Customer selects order, item, reason, and solution. |
| Checking eligibility | Staff compares the order with the policy. | Configured rules determine eligibility. |
| Choosing refund or exchange | Staff explains options by email. | Customer chooses from enabled options. |
| Tracking status | Staff maintains inbox notes or a spreadsheet. | Staff follows requests in the dashboard. |
| Customer updates | Staff writes individual replies. | Configured notifications provide updates. |
| Reporting | Staff organizes records manually. | Structured records support review; analytics depends on the plan. |
Manual handling can be reasonable for very few returns a month. A shopify return portal becomes more useful when repeated questions, inconsistent decisions, or tracking work interrupt fulfillment and support.

First check whether the customer needs a return at all. If the order has not shipped, it may be better to cancel the order on Shopify rather than begin a return process.
What to Look for in a Returns Portal
Evaluate a shopify return portal against your actual policy. A shopify returns portal should make that policy easier to apply, rather than force your team to work around it.
- Branding: Editable appearance, text, and policy access.
- Eligibility rules: Order date, fulfillment date, product tags, collections, and return windows.
- Reasons: Specific choices that produce useful information.
- Resolution options: Refund, exchange, store credit, and discount code options that match your needs and plan.
- Shipping: Carrier support suited to your process.
- Communication: Email notifications and relevant languages.
- Accessibility: A page you can place in store navigation.
- Approval: A merchant review workflow with clear responsibility.
How to Set Up a Shopify Return Portal with Yanet Returns & Exchanges
Before configuring your shopify return portal, write down your return window, excluded products, available resolutions, and approval process. Then use the following steps to translate those decisions into settings. Keep a fulfilled test order available for checking the customer journey.
Step 1: Install the app and enable the Return Page
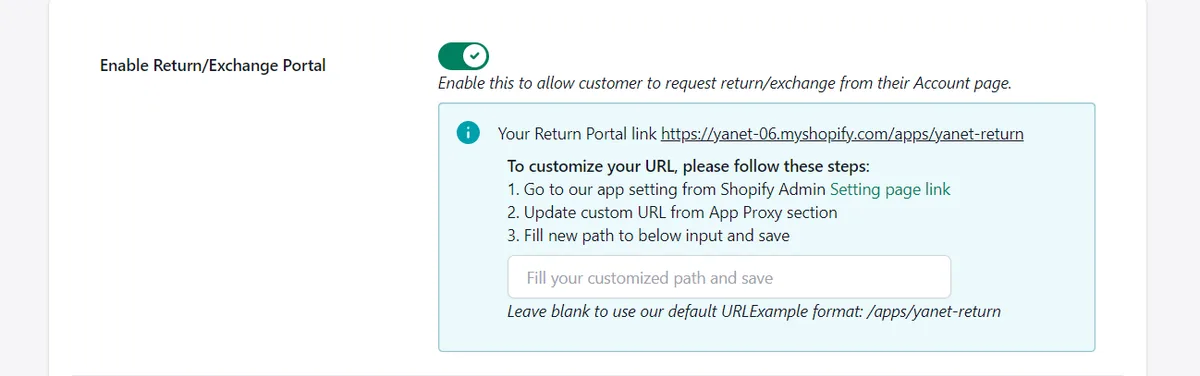
Install Yanet Returns & Exchanges from the Shopify App Store. Open Return Page in the app, enable the Return Page, and enable the option that allows customers to create requests.
This activates the customer-facing shopify return portal where shoppers submit return and exchange requests. Check both settings before moving on: an enabled page and permission to create requests serve different purposes.
Step 2: Brand your return portal page
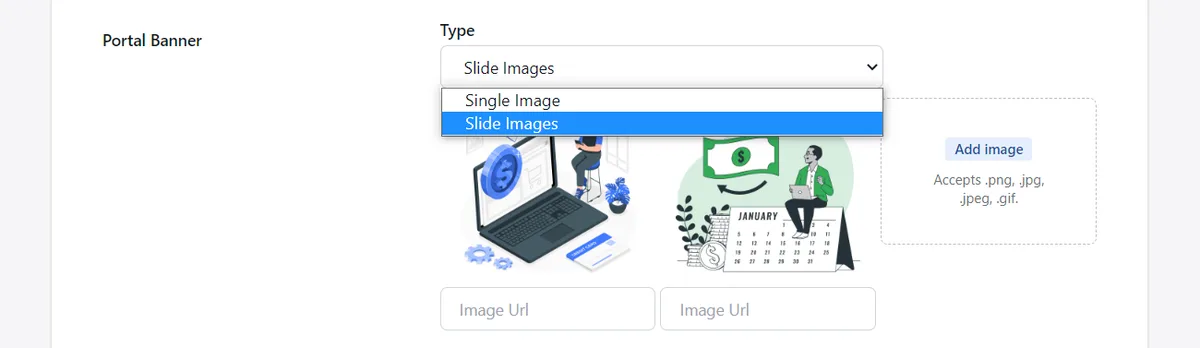
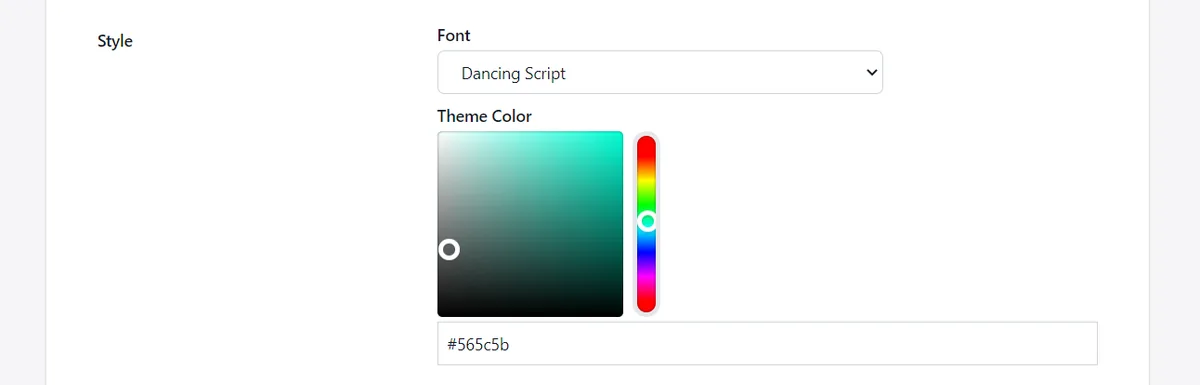
Match your shopify return portal to your storefront with a recognizable banner, readable text, and a consistent button color. You can upload a single banner image or use an auto banner slider, and add banner URLs for promotions.
Change the text font in the portal setup; contact Yanet if your required font is unavailable. Show a Return & Exchange policy link so customers can check conditions before submitting. Keep promotional banners secondary to the return instructions.
Edit text under Settings > Translations. Yanet supports 16 languages: English, Spanish, Finnish, German, Italian, Hindi, Japanese, Dutch, Polish, Portuguese (Brazil), Romanian, Russian, Turkish, Vietnamese, Simplified Chinese, and French.
Customize the Return Page URL with a readable path such as return-request or product-return. Use hyphens and avoid special characters such as &, *, ?, ., and / because Shopify may not accept them. You can also let customers contact the store when an order is ineligible.
Step 3: Add return and exchange reasons
Open Settings > Reasons and create ready-to-pick choices. Your shopify return portal should help customers describe the problem without requiring a long explanation.
Keep the list short and specific. An apparel store might distinguish “Too small,” “Too large,” “Wrong item received,” and “Item damaged.” Avoid overlapping choices that make customers guess and leave your team with inconsistent records.
You can configure which reasons require video evidence. Depending on the merchant’s plan, customers upload a file or enter a video URL. Request evidence where it helps your team assess the issue, rather than making every routine size exchange more demanding.
Step 4: Create return rules
Go to Settings > Rules. Configure eligibility for your shopify return portal using order date, fulfillment date, product tags, collections, and timeframes. Yanet supports return windows and non-returnable items.
Start with your general policy, then add product-specific conditions. For example, you could exclude a final-sale collection while allowing eligible apparel returns within your stated window. Different situations can have different policies, including a shorter holiday return window where appropriate.
Check which date starts each window. A policy measured from order date is not the same as one measured from fulfillment date. Make sure the rule matches your published wording, especially when orders take time to fulfill.
Step 5: Choose refund methods and shipping carriers
Open Settings > Refund methods and enable or disable the methods customers see. Keep the choices in your shopify return portal aligned with your policy and subscription.
The Free plan includes store credit and discount code refunds. For discount codes, you can set a prefix and a percentage of the code’s value. Gift code refunds are available on Professional and Ultimate.
Offering Shopify store credit gives customers an alternative to a refund. Explain the available options clearly so customers understand what they are selecting before submitting.
Same product/variant exchanges are available on all plans. Exchanges for a different product/variant require Professional or Ultimate. Check your plan against the exchange choices you intend to offer.
Under Settings > Shipping Carriers, review the listed EasyPost, FedEx, and Shippo integrations. Return locations can also be created for customers who live far from the store. Decide where returned items should arrive before publishing your instructions.
Step 6: Turn on email notifications
Open Settings > Email Notification and configure the sender name and email. Updates from your shopify return portal should use a recognizable sender so customers can identify them easily.
After adding or changing the sender email, check that inbox for a verification email from Amazon Simple Email Service. Complete verification as part of setup rather than leaving it until your first real request.
Customize and translate the email templates, and add your logo. Review the customer updates throughout the request process. Each message should explain the current position and any action the customer needs to take, using the same policy language as your page.
Step 7: Add the portal to your store and test it
Copy the Return Page URL and check that the App Proxy URL in Shopify settings matches the app. To add your shopify return portal to navigation:
- In Shopify admin, open Content > Menus.
- Choose the main menu or footer menu.
- Select Add menu item.
- Enter a clear label, such as “Returns & Exchanges,” and paste the proxy link.
- Save the menu and check the storefront link.
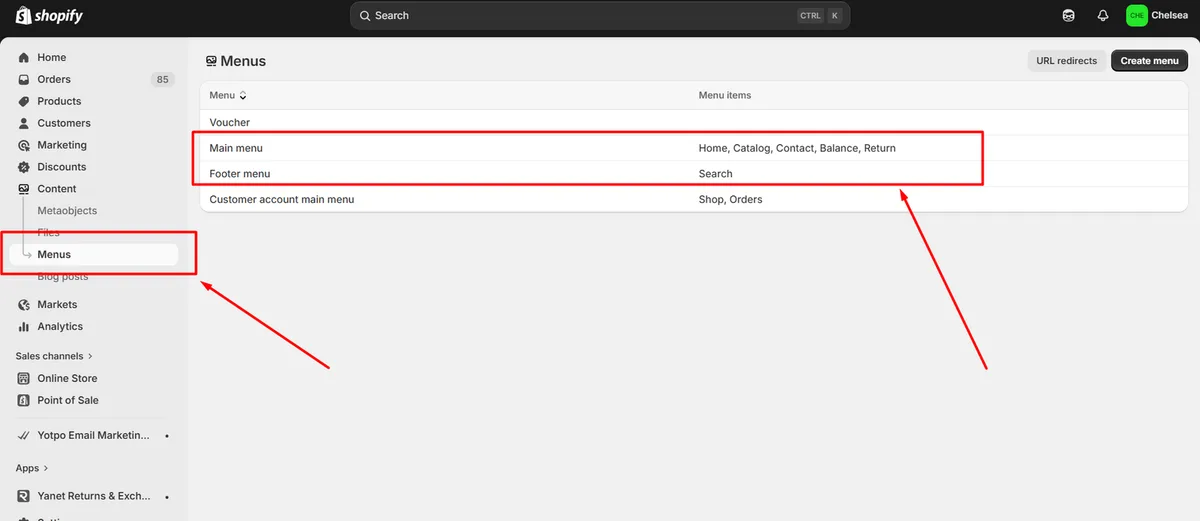
You can optionally add the Return Request widget. The Create Request option in the customer account appears only for fulfilled orders that meet your rules, so use an appropriate order when checking it.
Before launching your shopify return portal, test an eligible return, an exchange, a request outside your rules, and the notification emails. Verify the refund and exchange workflow from the merchant side, not only the submission screen. Check your plan’s request limit before accepting live requests.
What Customers and Your Team Do After the Portal Goes Live
A shopify return portal organizes intake, but requests still need a defined route to resolution. Assign responsibility for each phase so approved requests do not sit unattended.
- Customer submits: The customer opens the page, finds their order, selects an eligible item, chooses return or exchange, selects a reason and an available refund or exchange solution, then submits.
- Merchant reviews: Your team receives the request and reviews the details. When manual approval is required, approve or decline it; only approved requests move forward.
- Team receives and checks: Use Mark as Received, followed by Mark as Checked after inspection. You can optionally restock to a chosen warehouse.
- Team completes the resolution: For a refund, select Refund, confirm the amount, and send it through the customer’s selected refund method. Verify the applicable exchange workflow when handling exchanges.
Staff can also create a request on a customer’s behalf through Returns > Create Request. This helps when someone contacts support rather than starting online.
The Ultimate plan includes Automation Approval under Settings > Automation. The exact workflow varies with your rules and automation settings, so document the process your team actually uses.
Yanet Returns & Exchanges Plans
Choose a plan for your shopify return portal based on request volume, exchange requirements, and approval needs—not just the appearance of the page.
- Free — $0: 6 requests per month, customizable return portal, rules and reasons, same product/variant exchanges, store credit and discount code refunds, multiple languages, email notifications, and multiple shipping carriers.
- Professional — $9.99/month: 80 free requests per month, then $0.20 per extra request. Includes different product/variant exchanges, packing slip, gift code refunds, return/exchange fees and rewards by conditions, priority support, and a 14-day free trial.
- Ultimate — $29.99/month: Unlimited requests, everything in Professional, Automation Approval, dedicated priority support, and a 14-day free trial. Analytics is available on Ultimate.
Check whether your policy requires different-product exchanges or automated approval before choosing. A request allowance that fits today may also need review when your return volume changes.
Best Practices for Your Returns Portal
Keep your shopify return portal easy to understand. Customers should know whether an item qualifies, which solutions are available, and what happens after they submit.
- Publish the essentials: State the return window, eligible and excluded items, return methods, refund methods, and exchange conditions.
- Use specific reasons: Separate sizing issues from damage or incorrect-item requests.
- Make access obvious: Mention the page in navigation, the footer, order confirmation messages, and support pages.
- Explain the next step: Tell customers whether review is required and where to look for updates.
- Test regularly: Recheck eligibility and notifications after changing rules, wording, or settings.
- Review patterns: Use return reasons to improve product descriptions and sizing information.
Keep policy wording identical across your shopify return portal, emails, and policy page. Contradictory instructions create avoidable support work even when the settings are correct.
Review your shopify returns portal whenever your policy changes. Consumer-law requirements vary by country; this is operational guidance, not legal advice. Check the requirements that apply to your business and customers before enforcing exclusions or special conditions.
Conclusion
A shopify return portal gives customers a clear way to request returns while giving your team structured information and consistent eligibility checks. Manual handling can suit very low volumes; a dedicated page becomes useful as repetitive work grows.
Follow the seven steps: enable the page, brand it, add reasons, configure rules, choose resolutions and carriers, set up notifications, and publish the link. Test the complete workflow before launch. To begin, install Yanet Returns & Exchanges from the Shopify App Store and start on the Free plan or trial a paid plan.
FAQ
What is a Shopify return portal?
It is a customer-facing page where shoppers find an order, select eligible items, choose a reason and available resolution, and submit a return or exchange request. The merchant then manages the request through a dashboard.
Does Shopify have a built-in return portal?
Shopify admin handles refunds and returns on the merchant side. For a branded customer-facing request page with custom rules, most merchants use an app such as Yanet. Issuing a refund in the admin does not create that request page.
How do I add a returns portal to my Shopify store?
Enable the Return Page in Yanet and copy its URL, checking that the App Proxy URL matches. In Shopify admin, open Content > Menus, choose your main or footer menu, select Add menu item, paste the proxy link, and save. Test the link from your storefront.
Is there a free Shopify returns portal?
Yes. Yanet’s Free plan costs $0 and includes 6 requests per month and a customizable return portal. Check that its request allowance and resolution options fit your store before publishing.