
A shopify return label gives customers the shipping information they need to send an item back to your store. A clear label process helps you control who pays, direct parcels to the correct address, and avoid repeated questions about what happens next.
This guide explains free versus customer-paid labels, how to create and send them, and practical ways to reduce unnecessary shipping costs. You will also learn how Yanet Returns & Exchanges supports your shopify return label workflow through its Return Portal, carrier settings, tracking, and notifications. For a broader overview, read the Yanet Returns & Exchanges app breakdown.
What is a shopify return label?
A return shipping label is the prepaid or paid shipping label a customer attaches to a parcel to send it back to you. It identifies the destination and provides the shipping details needed for the return journey. Depending on the service, tracking helps both sides follow the parcel.
Your shopify return label policy should distinguish between three arrangements:
- Merchant-paid: You provide a prepaid return label and absorb the shipping charge.
- Customer-paid: The customer covers the label cost through a disclosed fee or deduction from the refund, where permitted.
- No store-provided label: The customer arranges shipping independently or uses an available return location.
“Prepaid” describes how the shipment is paid for before posting; it does not necessarily mean the return is free to the customer. If you recover the cost through a deduction, explain that before the customer agrees to return the item.
Labels reduce address errors, make parcels easier to identify, and support tracking. That can mean fewer misplaced returns and fewer support emails. If an order has not shipped, first check whether you can cancel the order instead and avoid a return shipment altogether.
Who should pay for a shopify return label?
There is no single payment policy that suits every store. Decide who pays for a shopify return label based on the reason for the return, your margins, and the service promise you can consistently maintain.
Free return labels
Free labels remove one obstacle to buying and can support customer confidence and loyalty. They are particularly reasonable when you shipped the wrong product or the item arrived defective.
The trade-off is cost: your store absorbs shipping even when the original order has a small margin. Before offering free returns universally, consider outbound shipping, handling work, and whether the returned item can be resold.
Customer-paid return labels
Charging customers can protect your margin on change-of-mind returns. You might deduct an agreed amount from the refund or require customers to arrange their own shipping, subject to your policy and applicable rules.
The main risk is surprise. Display the charge or calculation method before purchase where appropriate, repeat it during the return request, and explain whether original shipping charges are refundable.
A conditional approach
A conditional policy separates store errors from customer preference. For example, your store could pay for a damaged-item return while the customer pays when they simply prefer another color.
- Wrong or defective item: Consider covering the label cost.
- Change of mind: Consider a clearly disclosed customer-paid label.
- Convenient local return: Offer an available drop-off location.
- Unclear situation: Review the request before issuing shipping instructions.
Write down exceptions so staff make consistent decisions. Check applicable consumer requirements before charging a return fee, especially when the goods are faulty.
How to Create a Return Label Shopify Admin Can Generate
If you searched for “return label shopify,” start by checking what your store’s admin currently supports. Shopify can let merchants create a return against an order and add return shipping by purchasing an eligible label or uploading one obtained from a carrier.
Do not assume every store has the same shopify return label options. Availability, menu names, and carrier choices can depend on your plan, region, and carrier. Check Shopify’s current documentation and your admin before promising a particular service to customers.
- Open the order. Confirm the customer, delivery address, items, and fulfillment details match the request.
- Start the return. Use the return action available for that order in your current admin.
- Select items and quantities. Record the return reason and check eligibility against your policy.
- Choose return shipping. Where available, purchase a label or upload a carrier-provided label. Check the destination, parcel details, and service before proceeding.
- Send the customer their instructions. Provide the label through the available method and explain packaging, the shipping deadline, and any charge.
Keep return approval separate from refund approval. When the parcel arrives, inspect it according to your policy and consult Shopify’s guide to refunding and cancelling orders before completing the refund.
A manual shopify return label process can work for occasional requests, but it creates repetitive work as volume grows. In an email-only workflow, customers cannot initiate requests through a dedicated self-service portal, staff copy information between messages, and labels are handled one at a time.
Use a checklist while the process is manual. Record the order number, approval date, label status, tracking reference, receipt date, and refund decision in a consistent place.
How to Send a Return Shipping Label to the Customer
Send your shopify return label with the approval message, rather than making the customer ask for it separately. Whether you send it manually or use a supported notification workflow, check that the customer can access the label before considering the request ready to ship.
Keep the message short, but include enough detail to prevent another email:
- The order number and approved items.
- The label and any customer-paid amount already agreed.
- Packaging instructions and the correct carrier.
- A specific deadline for handing over the parcel.
- How to retain tracking and proof of drop-off.
- What happens after receipt and inspection.
For example, tell customers to pack the approved item securely, remove old delivery labels, and hand the parcel to the named carrier by the stated date. If they cannot print at home, ask them to check whether their selected drop-off point offers printing before traveling there.
How customers print return label PDFs
If you provide a PDF, explain that customers can print return label documents on plain paper when the carrier permits it. They should follow the carrier’s sizing instructions and check that the address and barcode are sharp and complete.
Ask customers to attach the paper securely by its edges. Avoid tape over the barcode if glare or wrinkles could interfere with scanning, remove conflicting old labels, and keep the drop-off receipt until the return is resolved.
Before sending a shopify return label, check that the tracking reference belongs to that specific return. Explain where the customer should look for updates and whom to contact if the parcel stops moving.
How Yanet Returns & Exchanges Handles a shopify return label
Yanet Returns & Exchanges provides a customer-facing Return Portal and a merchant dashboard. It supports return labels, carrier selection, return tracking, and shipping-related notifications, helping you organize requests beyond an email-only process.
Before using your shopify return label setup with customers, configure the shipping settings and test a representative request. Do not assume that connecting a carrier automatically completes every label-delivery step.
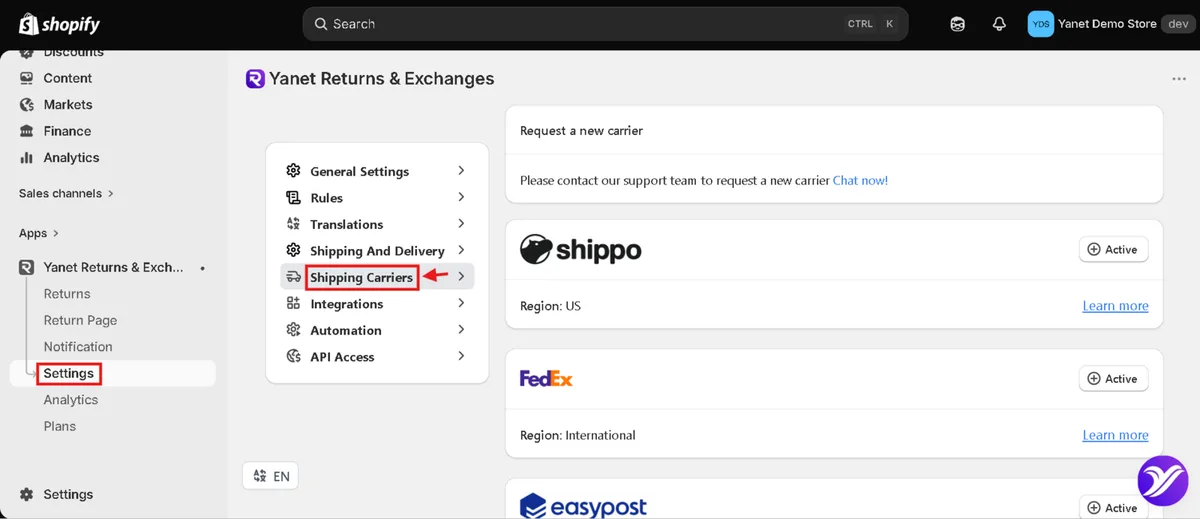
- Connect and test carriers. Open Settings > Shipping Carriers, select the carrier, and enter the required information or credentials. The app lists EasyPost, FedEx, and Shippo. Save the settings and test the carrier before using it on live requests.
- Review shipping and addresses. Open Settings > Shipping & Delivery. Review the available shipping options, configure them for your return workflow or create a new return address, and save.
- Decide how customers handle shipping. Configure the customer return shipping option and any applicable fee or shipping condition. Return and exchange fees by conditions are available on the Professional plan.
- Process the request. The customer submits a request through the Return Portal, and you approve or decline it. For an approved shopify return label request, the customer sends the item back. After arrival, select Mark as Received, then Mark as Checked, optionally restock to a chosen warehouse, and then select Refund.
- Check notifications. If email notifications are enabled, customers receive an update after each phase. Delivery status notifications can also keep them informed about return shipping.
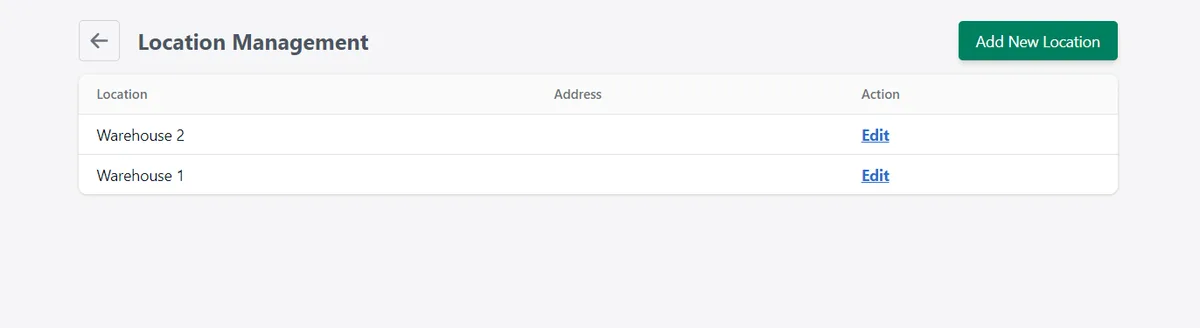
For nearby customers or situations where individual carrier returns are expensive, consider Return Locations. Go to Settings > Return Location > Add New Location. Customers can leave items at convenient locations, and you can collect them together.
You can review Yanet Returns & Exchanges on the Shopify App Store before choosing a plan. The Free plan includes six requests per month and multiple shipping carriers; that does not mean carrier postage is free.
Run through the process as both customer and merchant. Confirm the destination, shipping charge, instructions, tracking, and status messages before launching. This is especially important if different return reasons lead to different shipping arrangements.
7 Ways to Reduce Return Shipping Label Costs
Lowering shopify return label costs starts with preventing unnecessary shipments and choosing a consistent policy. Review the whole process, not just the amount charged by the carrier.
1. Set clear return rules and windows
Publish eligibility rules before customers buy and repeat them when they request a return. Yanet supports rules based on order date, fulfillment date, product tags, and collections, helping you define when a shopify return label should be considered rather than approving every request without review.
Distinguish between the deadline to request a return and the deadline to ship an approved parcel. Otherwise, an approval can remain unresolved while stock stays unavailable.
2. Use specific return reasons
Separate “wrong item received,” “damaged item,” and “changed my mind” instead of using one generic reason. Yanet supports a custom reasons list, giving your team clearer information when deciding whether your store should cover shipping.
Review the explanation before assigning fault. A size-related return, for example, may reflect either customer preference or inaccurate product information.
3. Apply fees or conditions consistently
Decide when your store pays for a shopify return label and when a disclosed charge applies. Professional-plan merchants can configure return and exchange fees by conditions in Yanet, but the policy still needs to be understandable to customers.
Show the applicable amount before the customer commits. Avoid introducing a new deduction only when you are ready to issue the refund.
4. Offer exchanges or store credit where suitable
An exchange or credit can preserve the customer relationship and keep purchase value with your store, although it does not remove shipping costs. Offer it as a useful choice rather than a way to avoid a refund the customer is entitled to receive.
Yanet’s Free plan includes same-product or variant exchanges, plus store-credit and discount-code refunds. Read more about Shopify store credit for returns and exchanges when deciding which options fit your policy.
5. Use return locations for suitable customers
Not every shopify return label needs to result in an individual carrier shipment. With a suitable return location, customers can drop items off and you can collect several returns together.
Compare collection time and transport costs with individual postage before committing. Give customers clear opening times, location details, and instructions for identifying their order.
6. Compare carriers and test the setup
Compare available services using realistic parcel weights, dimensions, destinations, and tracking needs. Yanet lists EasyPost, FedEx, and Shippo among its carrier options; availability alone does not establish which option costs least for your store.
Test credentials and the complete workflow before live use. Also check that staff know which service to choose for common parcel types instead of selecting by habit.
7. Prevent repeat returns with better information
Review return reasons alongside product descriptions, measurements, photographs, and size guides. Yanet’s Ultimate plan includes analytics, which you can use as part of a regular review rather than relying only on individual support conversations.
If one product repeatedly needs a shopify return label because its dimensions are misunderstood, improve the listing. Preventing the same avoidable mistake is more useful than repeatedly optimizing the resulting postage.
Common shopify return label mistakes
A shopify return label is only one part of a successful return. Most avoidable problems come from missing decisions or incomplete instructions around it.
- Sending labels before approval: Confirm eligibility, items, and the reason first. Otherwise, customers may ship products you have not agreed to accept.
- Leaving payment unclear: State whether shipping is free, charged separately, or deducted from the refund. Do not describe a customer-funded label as a free return.
- Failing to record tracking: Keep the reference against the request and tell customers to retain their drop-off receipt.
- Using the wrong address: Check the current destination, especially if you use multiple warehouses or return locations.
- Skipping a test: Test carrier settings, customer instructions, and notifications before real customers depend on them.
- Omitting the shipping deadline: Give a clear date and explain what customers should do if they cannot meet it.
Another common mistake is promising a refund date without separating transit, inspection, refund processing, and the customer’s payment-provider timing. Explain these stages in the approval message, and see how long Shopify refunds take when preparing your customer-facing wording.
Finally, review your shopify return label instructions whenever you change a carrier, warehouse, or fee. An old email template can undo an otherwise correct setup by directing customers to an outdated address or promising an option you no longer offer.
Conclusion
A reliable shopify return label process makes the payment policy, shipping instructions, tracking, and refund stages clear. Decide who pays first, verify the return address, and test the customer experience before issuing labels at scale.
Start with one common return scenario, then add exceptions as needed. Try Yanet Returns & Exchanges to organize requests through a Return Portal, configure carrier and shipping options, and keep customers informed as their returns progress.
FAQ
How do I create a Shopify return label?
Open the order, start a return, select the items, and review the available return shipping options. Depending on your store’s eligibility, you may be able to purchase a label or upload one from a carrier. If you searched “return label shopify,” remember that the exact workflow depends on your plan, region, and carrier, so check the current admin options before proceeding.
Can I offer a prepaid return label for free?
Yes. You can absorb the shipping cost and give the customer a prepaid return label without charging them. Alternatively, you can recover an agreed cost through a disclosed fee or refund deduction where permitted. Make the distinction clear: a label being prepaid does not automatically mean your store is offering free returns.
How do customers print a return label?
Customers can print return label PDFs at home when you provide that format, following the carrier’s instructions. They should check barcode clarity, attach the label securely, remove old labels, and retain their drop-off receipt. If they need printing assistance, ask them to confirm that their chosen drop-off location offers it before visiting.
Does Yanet Returns & Exchanges support return labels?
Yes. Yanet supports return labels, carrier selection, return tracking, and shipping-related notifications. Listed carriers include EasyPost, FedEx, and Shippo. The Free plan includes multiple shipping carriers and six requests per month; carrier postage is separate from the app plan.