
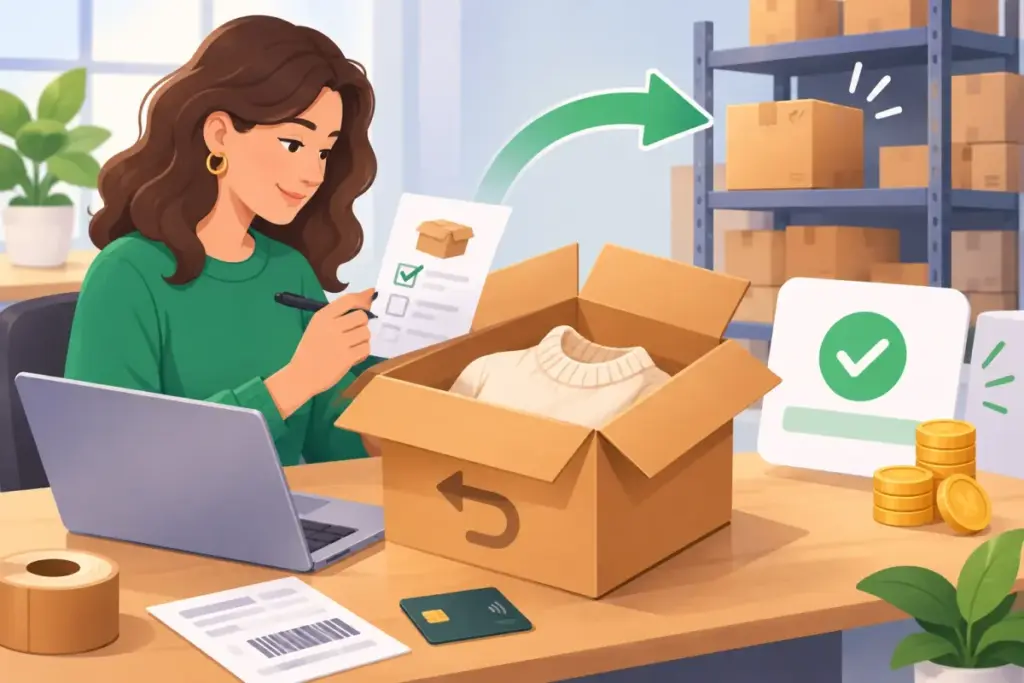
A shopify return order helps you manage items coming back after fulfillment, but creating the return is only the beginning. This guide covers creating and processing returns, the limits of manual handling, and automating the workflow with Yanet Returns & Exchanges. For an unshipped order, you should generally cancel an order on Shopify rather than start a return.
What Is a Shopify Return Order (and How It Differs From a Cancel or Refund)
A return, cancellation, and refund solve different problems. Choosing the right action keeps your order records clear and helps your team explain what happens next.
- Return: For an already fulfilled or delivered order when the customer sends items back.
- Cancellation: For an unshipped order that should not proceed to fulfillment.
- Refund: Money returned to the customer, with or without a physical return.
A shopify return order therefore tracks a different event from a refund. You might arrange for a damaged product to come back before refunding it, or decide that sending it back is unnecessary. Record that decision so your support team does not ask the customer to ship something you already agreed they could keep.
Before You Create a Shopify Return Order: A Quick Checklist
Before you create a return in Shopify, settle the policy and shipping details. A little preparation prevents you from having to change instructions after the customer has packed the parcel.
- Confirm fulfillment: Check that the order has been fulfilled rather than awaiting shipment.
- Check eligibility: Review your return window, exclusions, and the policy applicable to the purchase.
- Identify the items: Confirm the products, variants, and quantities coming back.
- Agree on the resolution: Clarify whether the customer wants a refund, exchange, or store credit.
- Assign shipping costs: Decide who pays and explain the shipping arrangement.
- Record the reason: Capture a specific explanation for later review.
For each shopify return order, keep these decisions together. For example, “wrong size, one shirt, exchange requested” is more useful than a note that simply says “return approved.”
How to Create a Shopify Return Order in Your Admin
You can create a return in Shopify from the existing fulfilled order. Match the order number, customer, and purchased items before making changes, especially when the customer has placed several similar orders.
Step-by-step in Shopify admin
Exact labels, available actions, and menu locations can change by store or Shopify version. Check the current official documentation, including Shopify’s guide to refunding and cancelling orders, if your screen differs from these generic steps.
- Open Orders: Go to the orders area of Shopify admin.
- Open the fulfilled order: Find the purchase and verify its details.
- Start the return: Look for the relevant return action on the order page.
- Select items and quantities: Include only what the customer is sending back.
- Choose a return reason: Use the relevant option where available and retain any necessary notes.
- Choose the shipping arrangement: Review the available options and use the agreed method.
- Create the return: Check the details before confirming.
Creating a shopify return order does not replace giving the customer clear instructions. Confirm what to send, where to send it, and what will happen after arrival. Avoid implying that creating the return means the refund has already been issued.
How to process a return in Shopify after the item arrives
When the parcel arrives, match it to the correct order before moving forward. To process a return in Shopify consistently, follow the same receiving checks for every parcel.
- Record receipt: Mark the return received using the available workflow.
- Inspect the item: Check the product, quantity, condition, and any relevant accessories.
- Decide whether to restock: Separate sellable items from damaged or incomplete goods.
- Review the refund: Check item amounts, shipping treatment, and taxes before issuing it.
- Notify the customer: Explain the outcome and any difference from the original request.
A shopify return order should have a clear outcome, even when the returned item is not suitable for resale. Document inspection findings so another team member can understand why you refunded, restocked, or escalated the case.
Issuing a refund and the customer receiving it are separate events. Explain how long customer refunds really take without promising a fixed number of days: timing depends on the payment provider and bank.
Limits of Processing a Shopify Return Order Manually
A manual shopify return order workflow can work for a small team. The difficulty is keeping requests, parcel handling, and customer messages synchronized when those activities happen in different places.

- Customer intake: The merchant admin alone is not a customer-facing submission channel. Without a separate self-service flow, requests typically arrive through email or chat.
- Eligibility checks: In an admin-only workflow, staff may need to check final-sale items, return windows, and seasonal exceptions individually.
- Repeated questions: Missing order numbers, item details, and reasons lead to more messages.
- Operational handoffs: Shipping arrangements, labels, status updates, and inventory decisions may require manual coordination, depending on your setup.
- Reason tracking: Notes scattered across messages make patterns harder to review in one place.
These are limits of relying on the admin alone, not a claim that every Shopify store has the same capabilities. Your configuration and other tools affect what is available.
Imagine a store handling many return emails each week. One employee approves a shopify return order, another receives the parcel, and a third answers the customer’s refund question. Without a shared sequence, the customer may get conflicting answers even when everyone is trying to help.
How Yanet Automates the Shopify Return Order Workflow
Yanet Returns & Exchanges is a Shopify app that manages returns and exchanges from one place, with a customer-facing Return Portal and a merchant dashboard. It gives your shopify return order workflow a structured path from request submission through review, receiving, inspection, and resolution.
Set your return rules once
In Settings > Rules, configure when customers can submit requests. Eligibility can depend on order date, fulfillment date, product tags, collections, and specific timeframes. This supports different policies for different products or situations, including non-returnable items or a shorter window during holiday periods.
For a consistent shopify return order intake process, configure reasons under Settings > Reasons too. Customers can then select from a ready list instead of describing every issue differently. Use distinct reasons such as sizing and product condition when those differences matter to your team.
Let customers submit a Shopify return request themselves
The customer opens the Return Portal, finds the order, and selects an eligible item. They choose return or exchange, select a reason, choose an available refund or exchange solution, and submit the request.
Your team receives the Shopify return request, reviews its details, and approves or rejects it when manual approval is required. You then process and complete it. Portal text, banners, and colors can be customized to match your store.
This gives each shopify return order a more consistent starting point. Customers provide the relevant selections before your team begins reviewing the case, reducing the need to reconstruct their request from separate messages.
Process a return in Shopify through four phases in Yanet
To process a return in Shopify using Yanet, move through these four phases. Each shopify return order should advance when the corresponding work is actually done.
- Phase 1 — Approve or Decline: Review the Request Detail page. Only approved requests move to the next phase.
- Phase 2 — Receive: Click Mark as Received when the returned items arrive.
- Phase 3 — Check: Inspect the items, click Mark as Checked, decide whether to restock, and select the warehouse.
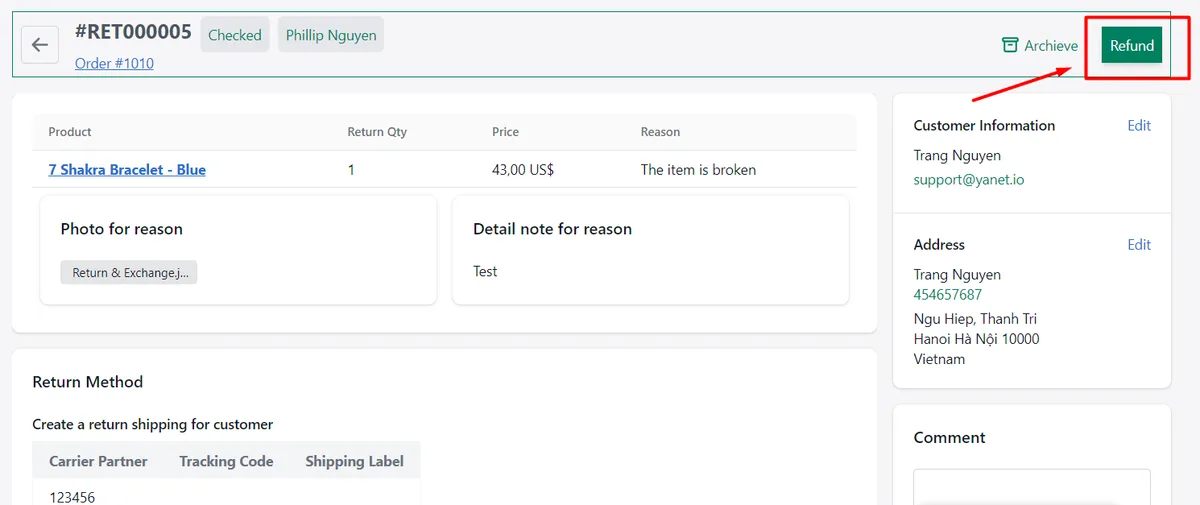
- Phase 4 — Refund: Click Refund, confirm the amount, and send the money through the customer’s selected refund method. The request is then completed.
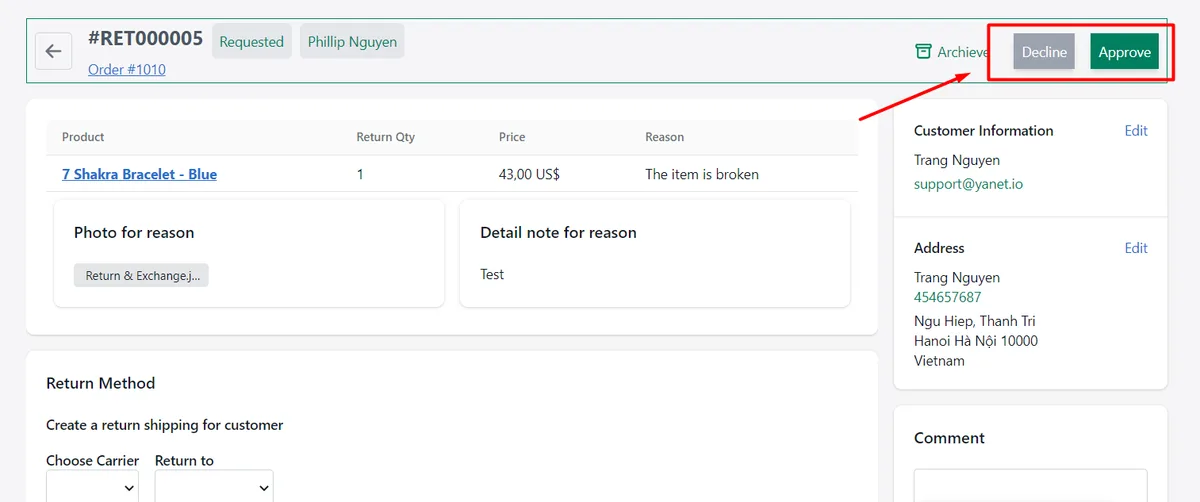
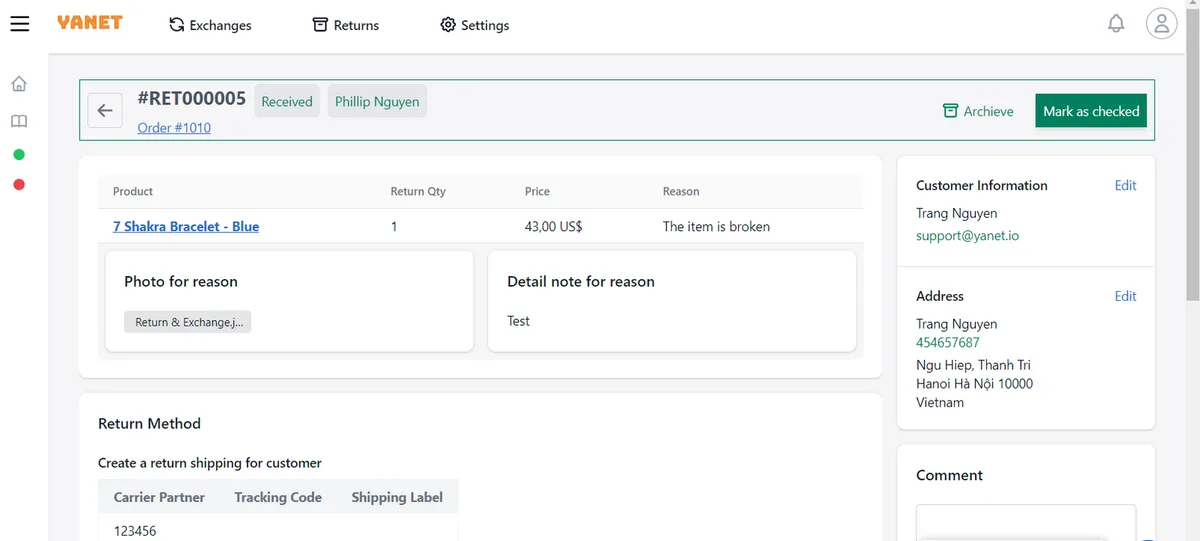
If email notifications are enabled, the customer receives an email update after each phase. Keep receiving and inspection separate: a parcel reaching your warehouse does not establish that its contents are correct or ready for resale.
Create a return on behalf of a customer
You can also create a return in Shopify through Yanet when assisting someone directly. This is useful when a customer contacts support instead of starting in the portal.
- Open Yanet Returns & Exchanges in Shopify admin and go to Returns.
- Choose the option to create a new request, then select the order.
- Choose Request type: Return or Exchange.
- Select at least one item, then choose the refund method and return shipping method.
- For Ship on your own, select a return location configured in the app.
- Optionally send the confirmation email, then click Create request.
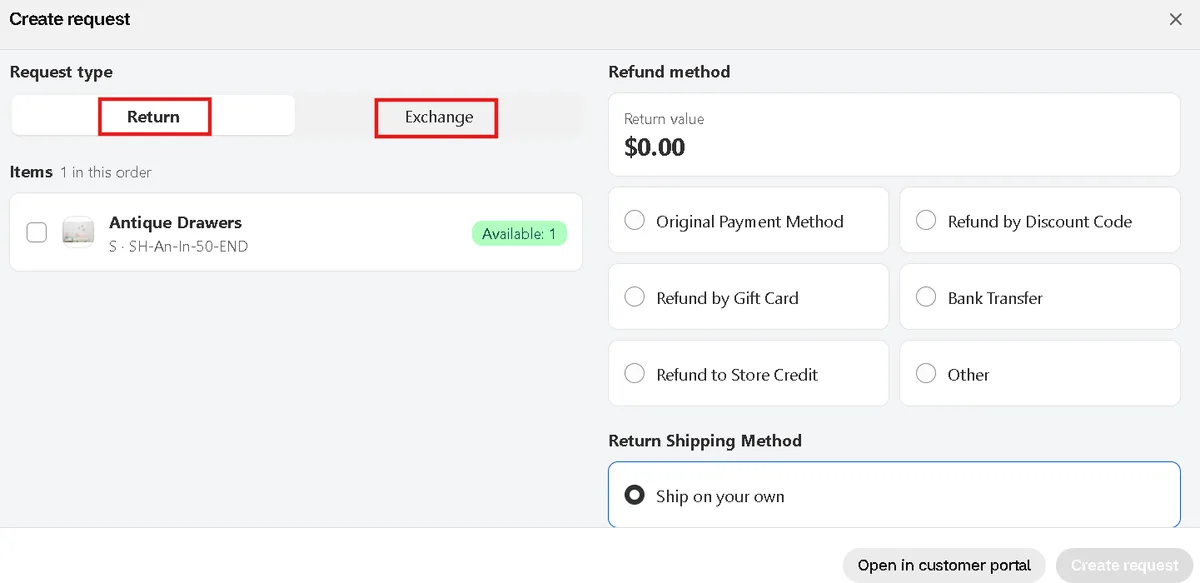
The Apply return rules and restrictions option controls eligibility checks. Disabling it lets you bypass restrictions, so use that exception carefully for a shopify return order. Manually created requests do not support photo or video evidence uploads; if evidence is needed, ask the customer to submit through the Return Portal.
Choose refund methods
Under Settings > Refund methods, enable or disable the methods customers see. Options include store credit, discount code refunds on Free, and gift code refunds on Professional and Ultimate.
Consider whether Shopify store credit fits the customer’s agreed resolution before selecting it for a shopify return order. Behavior depends on your Shopify configuration and the chosen option. Make the proposed resolution clear before processing it; a customer expecting money back should understand any alternative you offer.
Notifications, carriers and automation
Yanet supports email notifications for each status and 16 languages. You can connect EasyPost, FedEx, and Shippo under Settings > Shipping Carriers. These carrier connections should not be confused with a promise that every shipping task happens automatically.
On Ultimate, Automation Approval under Settings > Automation reduces manual approvals, and Analytics is available. Review the setup before relying on automation for a shopify return order, especially where exceptions need a person’s judgment.
A Shopify return request can have statuses including Requested, Approved, Refunded, Completed, Partially Refunded, Rejected, and Return Closed. Use the actual status when answering customers rather than saying a case is “done” while work remains.
Yanet Returns & Exchanges plans
Choose a plan based on request volume and the capabilities your shopify return order process needs.
- Free — $0: Six requests per month, customizable Return Portal, rules and reasons, same product/variant exchanges, store credit and discount code refunds, multiple languages, email notifications, and multiple shipping carriers.
- Professional — $9.99/month: Eighty requests per month, then $0.20 per extra request. Features include different product/variant exchanges, packing slip, gift code refunds, return/exchange fees and rewards, and priority support. A 14-day free trial is available.
- Ultimate — $29.99/month: Unlimited requests, everything in Professional, Automation Approval, and dedicated priority support. Analytics is available on Ultimate, and the plan offers a 14-day free trial.
Manual vs Yanet: Which Way to Handle a Shopify Return Order Fits Your Store?
The right shopify return order setup depends on where your team spends time. Compare intake, decision-making, and warehouse handoffs—not just the action that creates the return.
| Task | Manual in Shopify admin | With Yanet |
| Customer starts request | Admin alone is not a customer-facing submission channel. | Customers submit through the Return Portal. |
| Eligibility rules | Staff may check policy eligibility individually. | Configurable rules govern submission eligibility. |
| Approval | Staff review and coordinate decisions. | Manual approval; Automation Approval on Ultimate. |
| Receiving and restocking | Staff coordinate checks and available inventory actions. | Received and Checked phases, with restock and warehouse selection. |
| Refund method/store credit | Available options depend on configuration. | Configurable methods, subject to plan and Shopify setup. |
| Email updates | Communication depends on setup and staff follow-through. | Status emails when notifications are enabled. |
Smaller stores with few returns may manage manually. As volume grows, a workflow tool helps staff process a return in Shopify consistently without relying on memory or searching through inboxes.
Best Practices for Handling Every Shopify Return Order
A reliable shopify return order process needs clear instructions as much as software. Give customers and staff the same understanding of eligibility, shipping responsibilities, and the expected resolution.
- Keep your policy visible: Explain windows, exclusions, item-condition requirements, and shipping responsibilities in plain language.
- Use specific reasons: Separate issues such as sizing, incorrect items, and damage where relevant.
- Make the return page easy to find: Add it to store navigation rather than making customers search for instructions.
- Test before launch: Follow the customer journey through submission and check the merchant-side handoff.
- Review reasons regularly: Look for recurring product or sizing concerns that deserve investigation.
- Keep notifications accurate: Do not report receipt or inspection before those tasks happen.
- Preserve human review: Give staff a clear route for unusual circumstances and policy exceptions.
Assign ownership of each shopify return order stage, even if one person handles several stages. A simple internal checklist can prevent a received parcel from sitting unnoticed while the customer waits for an update.
Conclusion
Start a shopify return order from the fulfilled order, then receive the parcel, inspect it, decide whether to restock, and review the refund before issuing it. Manual handling can work, but separate messages and handoffs become harder to coordinate as requests grow. For a customer portal, configurable rules, and a structured processing workflow, install Yanet Returns & Exchanges from the Shopify App Store and test the journey before inviting customers to use it.
FAQ
How do I create a return for an order in Shopify?
To create a return in Shopify, open Orders and select the fulfilled order. Start the available return action, choose items and quantities, review the reason and shipping arrangement, and confirm. Exact labels and available options can vary by store or Shopify version, so check Shopify’s official documentation if your screen differs.
Can customers create a Shopify return request themselves?
Not through the merchant admin alone. With Yanet’s Return Portal, customers can find their order, select an eligible item, choose return or exchange, provide a reason, and submit an available resolution. Submission is subject to your configured rules, and your team can review the request when manual approval is required.
Can I create a return for a customer in Yanet?
Yes. Open Yanet, go to Returns, and choose the option to create a new request. Select the order, request type, items, refund method, and shipping method, then create it. Apply eligibility rules unless you intentionally need an exception. Manual requests cannot include photo or video evidence uploads; use the portal when evidence is needed.
Does Yanet have a free plan?
Yes. Yanet’s Free plan costs $0 and includes six requests per month. It provides a customizable Return Portal, rules and reasons, same product/variant exchanges, store credit and discount code refunds, multiple languages, email notifications, and multiple shipping carriers. Choose a paid plan if you need higher request capacity or additional capabilities.